Welcome!
I'm sharing here some notes on how i configure Virtualbox after the installation.
Except the guest additions, the rest could apply to a normal installation too (because i usually use netinstall iso).
So better pile up all the things i otherwise have to search in internet every time i format, because i have short memory. :-p
Let's start!
This post is subject to updates, if i find interesting tips i will add them here!
Setup Sudo
Login as root and install sudo
# apt install sudo# nano /etc/sudoersroot ALL=(ALL:ALL) ALL.Below it write this
USERNAME ALL=(ALL:ALL) ALLUSERNAME with your standard login username.Now you can disconnect and if you login with your username you should be able to do everything.
Setup Guest Additions
Guest Additions are very useful to share data between host and guest vm.
I use it a lot, for example i mount an host folder as shared into the guest.
Now "insert" the disk of Guest Additions and...
$ sudo apt update && sudo apt upgrade -y
$ sudo apt install build-essential dkms linux-headers-$(uname -r) -y
$ sudo mkdir -p /mnt/cdrom
$ sudo mount /dev/cdrom /mnt/cdrom/
$ cd /mnt/cdrom/
$ sudo sh ./VBoxLinuxAdditions.run --nox11
$ sudo adduser USERNAME vboxsf
$ sudo shutdown -r now
USERNAME with your standard login username.I used the option
--nox11 because i usually do this via ssh or in console.If you mounted a shared folder into VirtualBox UI you can now see it mounted
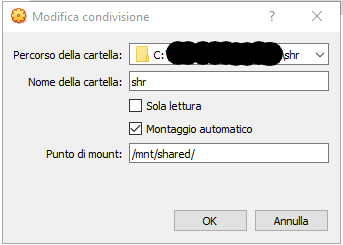
(see example, where host's
shr folder is mounted automatically at /mnt/shared/ )
Setup Static IP Address
This refers to Debian. Other distros like Ubuntu may have different methods to set it.Sometimes i need to set the network interface to a static IP. It's very easy to achieve it.
First check what's the actual address
$ sudo apt install net-tools
$ sudo ifconfig -a
Also check the name of your network interface you want to set static (in my case the ethernet which is enp0s3).
Now we are going to set it static by editing this file
$ sudo nano /etc/network/interfacesiface enp0s3 inet dhcpiface enp0s3 inet static
address 192.168.0.10
gateway 192.168.0.1
netmask 255.255.255.0
dns-nameservers 192.168.0.1, 9.9.9.9$ sudo ifdown -a; sudo ifup -aShrink VM virtual disk
After days and days the vm virtual disk become bigger than the actual used space.
There's a procedure that can help gain some space...even few GB if you're an animal like me.
I suppose you're on a windows host with a virtual debian guest.
First we need to know what disk to optimize. Launch
$ sudo dfNow install zerofree and clean apt packages and cache.
$ sudo apt update && sudo apt upgrade -y && sudo apt install zerofree
$ sudo apt autoremove && sudo apt autoclean && sudo apt clean
$ sudo shutdown -r nowlinux ..." and add break=init at the end of line.Press CTRL+X You should arrive in a shell that start with
(initramfs)Now digit
mount --bind /proc $rootmnt/proc
chroot $rootmnt /usr/sbin/zerofree -v /dev/sda1exitcd C:\Program Files\Oracle\VirtualBox
VBoxManage.exe modifymedium disk "C:\Users\USER\VirtualBox VMs\vbox\vbox.vdi" --compactOnce i had an issue with Ubuntu install: it didn't show me the grub menu.
It was necessary to edit the grub configuration.
$ sudo nano /etc/default/grubGRUB_TIMEOUT_STYLE=menu
GRUB_TIMEOUT=5
GRUB_TERMINAL=console$ sudo update-grubOther small things
Other basic tools not included in netinstall are
$ sudo apt install curl wgetIf i have to install linux on a remote machine that i don't access daily i usually configure unattended-upgrades
$ sudo apt install unattended-upgrades
$ sudo dpkg-reconfigure -plow unattended-upgrades$ sudo nano /etc/apt/apt.conf.d/50unattended-upgradesUnattended-Upgrade::Automatic-Reboot "true";
Unattended-Upgrade::Automatic-Reboot-WithUsers "true";Once i had an issue with a netbook on which i installed pihole for my network. I closed the lid and it went in suspension. It's pretty easy to change this behaviour.
$ sudo nano /etc/systemd/logind.confHandleLidSwitch
HandleLidSwitch=ignorelock, suspend, poweroff and hibernate.